Thursday, 13 June 2013
Saturday, 2 March 2013
Technical comments.
My first task was to research to idents and two interactive menus. I chose a Toy Story and Iron Man interactive menu and two BBC Three idents. In this short evaluation of them I will be describing what I saw when watching them and what techniques were used to create what I'm watching. I watched the idents and interactive menus in question on YouTube as this was the only access I had in terms of viewing them.
A big part of the research I did was to find out more about the technical side of things and the appearance. I will be looking at what was actually needed to create the final appearance. I will be doing this by reviewing the codes and size formats used. I will be looking at how they all vary from each other and why they do so.
I found that there are all different types of screen sized and they vary for different things. Obviously the screen size will change when on a different sized screen, for example, normal box style televisions will be different to flat screen televisions as they will be wide screen. If you created the esting on a small screen and didn't change the size format then you could encounter problems when view it on one of the two screens above. It could be a situation where the esting looks fine on the box style television and also on the wide screen TV but if you changed the screen size on the flat screen TV to a wider view setting then the esting could appear stretched as you sometimes find and you would then lose the quality of the esting and it will look quite pixelated. This is why screen size and format is so important for the appearance. The basic way to classify TV quality is by resolution; here are a few standard resolution sizes, 480i, 720p, 1080i, and 1080p. The bigger the number is, the greater the screen resolution. The 'i' and 'p' stand for interlaced and progressive scan.
Thursday, 17 May 2012
Thursday, 10 May 2012
HA6 - Task 6
HA6 - Evaluation.
The HA6 Assignment was to create an e4 sting. To do this we were given six tasks to complete in order to create the ident. The tasks varied on how big and small the work was. This assignment was one of the bigger assignments I’ve had to do as there was a lot of thorough and detailed research based work to be done.
Task 1
Task one was fairly simple as I just had to produce a production log, planning how long I predicted the work would take me and when I could have it finished by. I didn’t really plan my work load out as well as I could have as the work didn’t get completed on time therefore I had to add onto my plan and strike out my first deadline and replace with an increased one. It turned out that my work didn’t get completed on the deadlines I had on both my first draft plan and the final draft as I didn’t finish the article and evaluations in time so my other work had to be put on hold so this delayed the work process.
Task 2
For the second task we had to go on the e4 website and view previous e4 stings to get an idea of what they look for in their stings. After researching I then had to create mood boards and talk about previously used e4 stings and what I liked about them and if I was to change anything what I would do. I changed my mind a few times as I viewed more example e stings, I couldn’t decide whether I wanted my e sting to be detailed or quite simple so the audience’s attention would be solely on the e4 logo or whether this would make it too boring.
By looking at the e4 website it gave me a good idea of what sort of things could be done and how they can vary and opened up my mind to more creative designs. I then had to blog all of the research I had done as evidence.
Task 3
After viewing and researching previous e4 e stings and what type of things was required, I then had to create my own ideas generation and come up with a few rough ideas so I had a variety to choose from when it came to picking my final idea for the e sting.
Personally I found this task quite a tricky one as I didn’t really have a clue how I would create the things I wanted to but then I realised I would be using a few software’s and pretty much anything would be able to be created. I then went through my idea generations with my tutor and we expanded on my ideas and then blogged them ready to go back to when I moved onto task 4, the storyboards.
Task 4
For task 4 I had to narrow down my ideas. I chose two of my strongest ideas and made them into storyboards. I then looked through them and chose which storyboard I preferred. After I had chosen my final storyboard I had to find images on the internet to get ideas to create the idea. I then again spoke to my tutor and we went through the run cycles I had found on the internet and decided which would be best to trace on Illustrator. We chose the Hare run cycles. I decided this was the best one to use as it’s quite unusual and after doing research on previous e4 e stings that is what the channel like. My other options were using a person or a different animal or even an object. I then blogged all of this on Blogger as evidence.
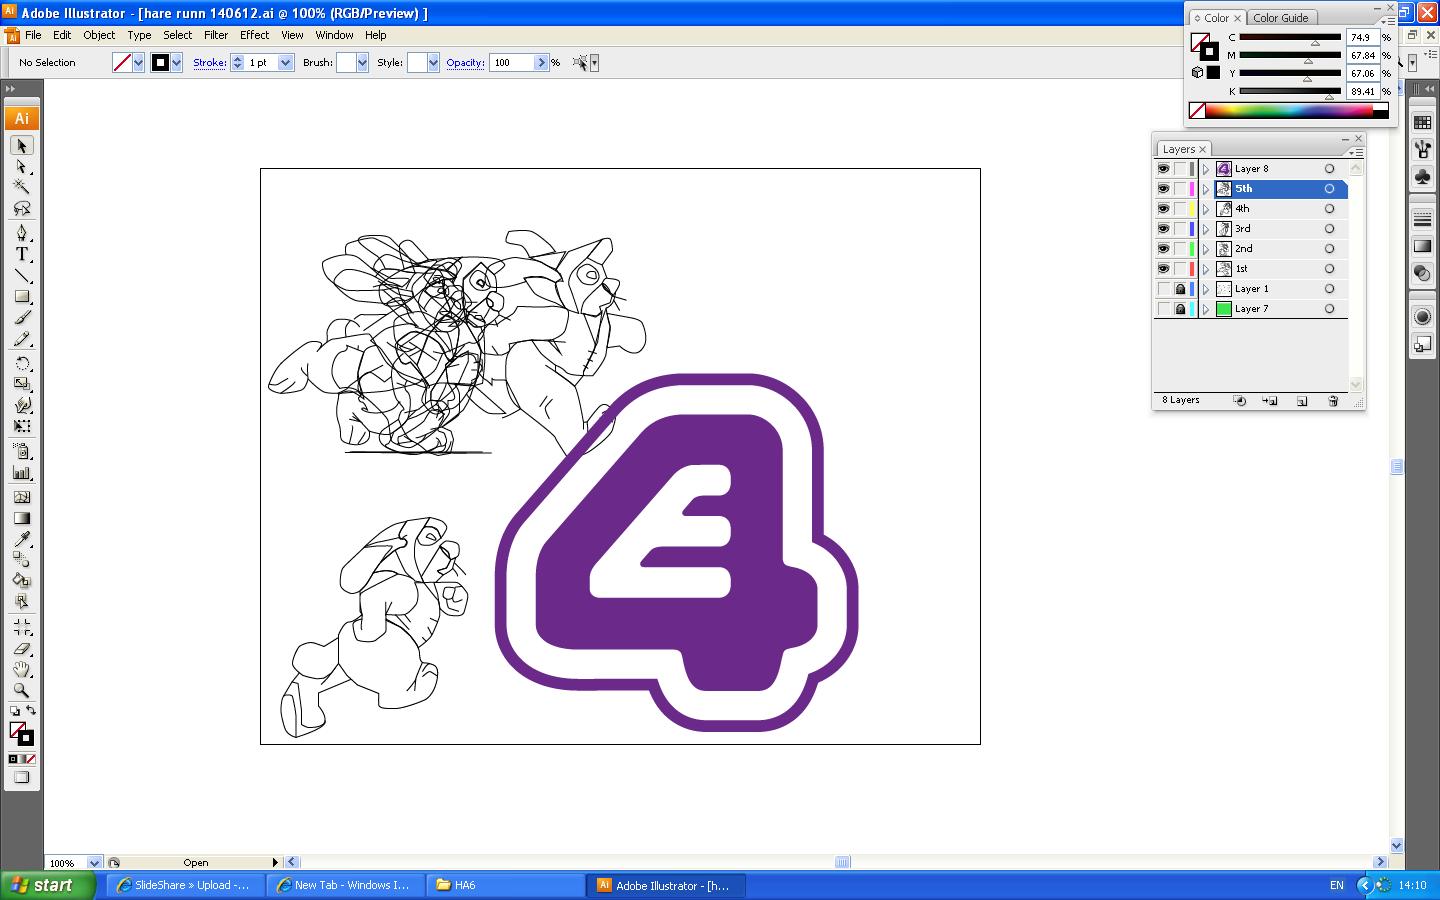
The next stage of task 4 was to open up the run cycle in Illustrator and trace all 5 of the hares for my sequence. This took around an hour or two to do and then add things and erase parts that weren’t needed/didn’t look right. When that was complete I then brought the e4 symbol in and added different background colours to see how it would look.
I decided on a grey background and leaving the hares with just a black outline as I wanted the sole attention to be on the e4 symbol and the hare running. To put my sequence into practice I opened it in Photoshop and tested the sequence, when played it works really well. I had to change the sequence to different movements every 0.1 seconds instead of 0.2 as it was too slow and didn’t look right. Once this was complete I moved onto Flash.
I opened my work in Flash and put each hare on a different layer. I moved them all to the specific place they should be so the sequence works. I had to make different layers and put specific times in so they played at the right and selected time. I then played the sequence to see if it looked right.
I then had to bring the e4 symbol in. I then had to create motion tweens for the e4 so it moved at the specific times.
I experienced a few problems when it came to exporting the sequence out of flash as the sequence was all grainy and didn't work so we had to upload it to Moodle instead and then at a later time export the sequence again and see if it works, however it will be a bit more time and trickier than first thought.
I experienced a few problems when it came to exporting the sequence out of flash as the sequence was all grainy and didn't work so we had to upload it to Moodle instead and then at a later time export the sequence again and see if it works, however it will be a bit more time and trickier than first thought.
HA6 - Task 5
e4 sequence: creating.


I had to bring my five hare traces into Flash so I could create the sequence and bring it more to life. As you can see above at the top of the screen there is a box where I change the times the hare moves and how fast it moves. I had to edit these for all five so they move the way I need them to and at the right times.

Once all the hares had been timed in and out correctly I then had to bring the e4 symbol in. In my sequence the e4 chases the hare and then the hare chases the symbol and then they both go off screen and the e4 symbol splats into the center of the screen as the ending. This was relatively easy to do as I just had to again create motion tweens so it was timed correctlty. I then had to change the timings a bit as the hare ending up running with the hare and it had to be infront of it.
COMPLETED E STING ON UNIT 64 MOODLE COURSE!!!!!!!!!!
HA6 - Task 4
1.

2. 

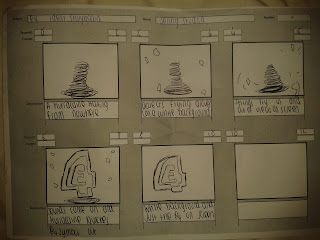
Final Chosen Storyboard.
For this idea I plan to add little changes to it when bringing my ideas to life by changing the person being chased to an animal to give my e4 ident that dream like quality. I chose a hare to trace on Illustrator. I found the image below on the internet, the image features 5 hares each with slight different movements. When pieced together this will produce the hare running like my idea shows.

Process.
First I had to open the above hare template in Adobe Illustrator and then I had to one by one trace other them for my work. I did each hare on a different layer each. Below are the finished traces of the hares. I then put these together to see how they work together and for my sequence, I did this on Photoshop, you can see this with the printscreen below. I then went back to Illustrator to test background colours against the hares and then brought in the e4 symbol to see how they all go together and if it would look right.


Tuesday, 8 May 2012
Subscribe to:
Comments (Atom)